The purpose of this guide is for customers that have multiple sites that connect through a terminal server to the main server to be able to set up and use the Opticon Stocktake scanner. This process is different to the original guide because a terminal server can't read the settings for the USB stocktake scanner.
1. Transfer the stock items from the SERVER
- Firstly, you need to setup the Autosoft stock scanner program. This can be found in the Autosoft5\Programs folder.
-
Scanner Interface Configuration
- From Autosoft Task Bar select the option 'Stocktake Input'
- Select 'Prepare Stock Scanner'
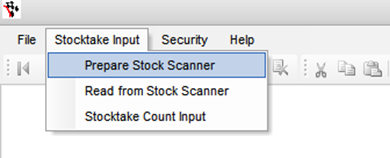
Note: If you do not see the Stock Scanner Import option in your task menu, please ensure that your user rights have set properly by your management. See Security Maintenance in Autosoft to access your user rights.
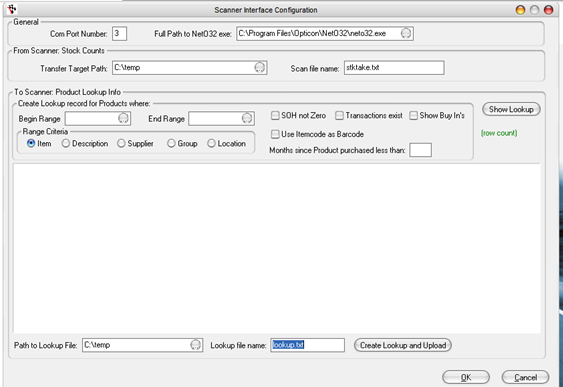
- Set 'Transfer Target Path' to c:\temp
- Set 'Scan file name' to stktake.txt
- Set "Path to Lookup File' to c:\temp
- Set 'Lookup file name' to lookup.txtNote: To verify the COM port number use by the OPL9728 Scanner, please click on Start and then Run. Type the following command in the Open: text box, and then hit the Enter key or click on the OK button.
devmgmt.msc
Device Manager should display right away.

- Expand the 'Ports (COM & LPT)' option
- Check COM number assigned to the Opticon OPL/CRD USB Serial Port (COM3) in our example
Create Lookup File and Upload to Opticon Scanner Device
- After completing the 'Scanner Interface Configuration flag the 'Stock On Hand not Zero' and Click on 'Show Lookup'
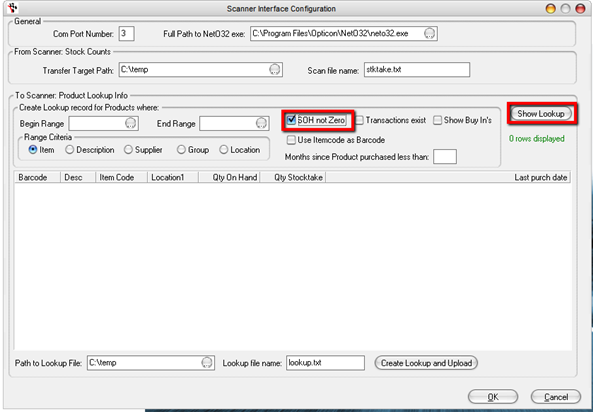
- Autosoft Scanner will now display your items list that will be transferred to the Opticon Scanner handheld.
- Click "Create Lookup and Upload" to create the lookup.txt file
Note: You can use both options, Stock On hand not Zero and Months Since Product purchased less than to filter the items list that you want to transfer to the scanner. Click on Show Lookup to refresh the list.
- Secondly, take the lookup.txt file and transfer the file to the computer that the stock scanner is plugged into
2. Setup NetO32
- Choose RS232 from the menu at the left, and make the following changes:
- Choose the COM port for your cradle (COM 1 if using RS232, check Device Manager for USB ['Start' > 'Run' > 'devmgmt.msc' > click 'OK' and look under the 'Ports' section])
- Change the Baudrate to 115200
- Change IrDA Device to 'None'
- Select 'Upload' and do the following
- Click Add
- Choose the Lookup.txt file you transferred
- Select 'Download' and do the following:
- Choose the folder the file will be downloaded to
- Select OK
- Save the settings
- Select File - Save As
- Choose a file name that is appropriate, and save the template
- Once this is done, from now on, you will need to select File - Open and choose this file to load these settings
3. Upload lookup.txt to Stocktake scanner
- Make sure the Scanner is on Receive Lookup
- On the scanner choose Utilities - Rcv Lookup
- Place the scanner in the cradle
- Go to Protocol - Start
4. Download lookup file and Transfer to the SERVER
- Make sure the NetO32 is currently off. If not, go to Protocol - Stop
- Make sure the Scanner is ready to send data
- Go to Send Data on the stocktake scanner
- Place the scanner in the cradle
- Select Protocol - Start
- Once file is downloaded, go to the folder you selected in the download section of Tools - Options, copy the lookup.txt file and paste it on the SERVER
- Change name of file to "stktake.txt"
5. Upload the file to Autosoft
- On the server, in the Stock Scanner program, put the stktake.txt file address in the From Scanner: Stock Count section
- Click "Create Lookup and Upload"
0 Comments